Arduino Web Server using ESP8266 / ESP32
In this tutorial will explain, how to create a Arduino webserver with and without websokets using ESP8266 board. ESP8266 board will able to answer a HTTP request . After opening a web browser and navigating to your ESP board IP Address, ESP board will turn ON and OFF the LED from a browser. Dowload a code files click here.
Types of Arduino webserver
- Arduino webserver without websockets
- Arduino webserver with websockets
Bill of Materials
- ESP8266 (Nodemcu) - 1Nos
- Bread board - 1Nos
- LED - 2Nos
- Jumper wires
- usb cable for power up the ESP8266 - 1Nos
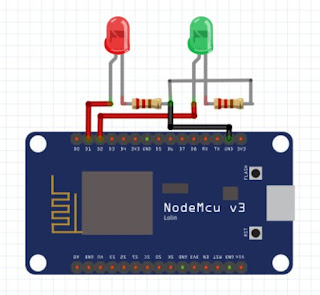
Diagram:
1. Arduino webserver without websockets
Refer the below code for Arduino webserver without websockets.
2. Arduino webserver with websockets
Refer the below code for Arduino webserver with websockets.After upload the above code, The below index.html file will be uploaded by using ESP8266 sketch data upload tool
index.html
Note: If you try this project. You can only access that only at 192.168.10.10 IP Address from your house and SSID : webserver, Password : project1.


No comments