
I2C LCD connect with ESP8266 /ESP32
This tutorial guide to use the I2C LCD (Liquid Crystal Display) with the ESP8266 / ESP32 using Arduino IDE. We’ll show you how to connect the LCD, install the library and try code to write text on the LCD.
Parts Required
1. Nodemcu -1 Nos
2. ESP32 DEVKIT Board - 1 Nos (Optional)
3. I2C LCD - 1 Nos
4. Female to female jumper wires - 4 Nos
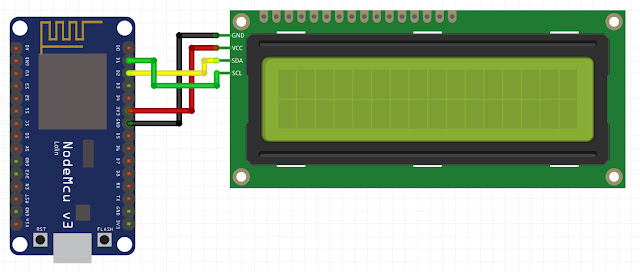
NodeMCU Connection Diagram
Connect the i2c LCD as per the below diagram. NodeMCU D1 (GPIO5) pin connect to LCD SCL, D2 (GPIO4) connect to LCD SDA pin and connect VCC, GND connect respectively.
ESP32 DEVKIT Connection Diagram
Connect the i2c LCD as per the below diagram. ESP32 DEVKIT D1 (GPIO22) pin connect to LCD SCL, D2 (GPIO21) connect to LCD SDA pin and connect VCC, GND connect respectively.

Required Library
Code
#include "wire .h"
#include "liquidcrystal_i2c .h"

// Set the LCD address to 0x27 for a 16 chars and 2 line display
LiquidCrystal_I2C lcd(0x27, 16, 2);

void setup()
{
	// initialize the LCD
	lcd.begin();

	// Turn on the blacklight and print a message.
	lcd.backlight();
	lcd.print("Hello, world!");
}

void loop()
{
	// Do nothing here...
}
Output

No comments